
Despite the list of equipment and what looks like a complicated process, this is actually an incredibly easy and quick way to make a loaf of bread.
The “Fifteen Minutes” refers to the amount of “hands on” time to make the dough. It excludes proofing and baking times. My goal, in creating this recipe, was to make bread that never requires touching the dough with my hands. -John
7-14-20 Update: I initially baked the bread in a 12″ cast iron skillet, but more recently, son-in-law Troy got better results baking the dough it in a Dutch Oven. After trying Troy’s approach, I found that the Dutch Oven produces a better loaf of bread that is slightly taller that the skillet version and slightly less complicated to bake, as there is no added humidity necessary.
12-24-21 Update: I discovered that using a stainless steel bowl and proofing the dough on a quartz or stone counter produces a smaller loaf (because the cold counter sucks the warmth produced by the yeast activity). So don’t use a SS bowl and place your bowl on a cutting board or something that doesn’t readily transmit cold. I now use a melamine bowl.
11-16-22 Update: After watching a bread-making video on YouTube, I decided to adjust the cooking times and temperature, which are reflected in the instructions below.
11/14/23 Update: A couple of improvements: First, we turn the Dutch oven over; center the 15″x15″ parchment over it, and crush down the paper over the sides of the Dutch oven and crease it, to create a mold. Then secure it with a large rubber band, flip it over and put it back into storage. When it’s time to bake, remove the rubber band, and push the paper mold into the pre-heated Dutch oven just before pouring in the dough. This results in a better shape.
4-15-25 Update: We purchased a “bread lifter.” Specifically, a “King Arthur Baking Company Round Loaf Lifter for Dutch Ovens.” It’s non-stick silicone and reusable, obviating the need to deal with parchment paper. You simply place the lifter into the Dutch oven and pour the dough in. Highly recommended.
8-18-25 Update: There are two recipes below. The first is the original recipe, which we have made for a number years. However, I often thought, “I wish the bread slices were slightly larger,” so I increased the ingredients by about 20%. That recipe appears after the Original
Found on a bread-making blog:
“I have successfully used Fleischman’s Active dried yeast 18 years beyond the due date. It was stored in a dark pantry at room temperature. Proof the yeast to see if it has any activity. then use the yeast to make a poolish, 50 gms. of flour 50cc. of water and a small (1/4) tsp. of yeast. Ferment on the counter until you see bubbles, then into the refrigerator overnight. The next morning you have the equivalent of 2 pkgs. (5 gms.) of fresh yeast ready to use. This is a great way to extend your yeast in this dearth caused by the Covid-19 pandemic.”
There are about 52 tablespoons of yeast in a pound. For this recipe, one pound of yeast would yield 624 quarter teaspoons. It would be a good idea to break up a pound into four batches; to vacuum seal them in mylar bags for long term storage; and, to store them in the refrigerator.
Original Recipe
Makes one large loaf
Special equipment:
A large bowl (Melamine is ideal; do not use a metal bowl)
A flat silicone spatula something like this (or a bowl scraper)
Bread lifter -OR- a piece of parchment paper, cut to 12″ x 15″
A wood mixing spoon
A digital kitchen scale
A timer (or use your smartphone)
A 6-quart enameled cast iron Dutch Oven (like this one)
If you want to be fussy, like me, use a digital thermometer (like this one) to confirm the water temperature.
Oven mitts or pot holders
Optional: Flour sifter
Ingredients:
520 grams All Purpose flour (4 cups)
1/4 teaspoon Instant yeast, very slightly rounded
2 teaspoons salt
550 ml warm water (~100 deg. F) (~38 C)
Notes:
- Confirm the maximum temperature that your Dutch Oven is rated for. Some have a heat resistant cover knob that is limited to 450 deg. F (232 deg. C). Either replace it with a metal knob (which is what I did) or get a different Dutch Oven.
- I use King Arthur Unbleached All Purpose Flour for this recipe.
- Test your oven with a temperature probe to determine what temperature it actually reaches when set to 500 deg. F. All ovens vary and knowing the actual temperature will help you adjust the timing, if needed. (Update: I used an infrared thermometer gun and learned that I need to heat the Dutch oven for 30 minutes after the oven states it has reached temperature.)
- There is no need to “punch down” the dough.
- Assemble all equipment and ingredients before starting. (Tip: this applies to any recipe).
- Using a digital thermometer, determine how long it takes to heat the water to 100 degrees F. (38 deg. C). Our 1000 watt microwave reaches about 100 degrees F (38C) in 40 seconds. If you don’t have a thermometer, heat the water to the point that it’s approximately body temperature.
- To proof, I cover the bowl with a large piece of aluminum foil (which I re-use numerous times.)
- Place the bowl on a flat silicone pot holder or wood cutting board. Placing the bowl on a stone or quartz countertop robs heat from the dough and it doesn’t rise to full potential.
- I discovered that sifting the flour improves the rise.
- If the bottom of your bread is charred, it has baked too long and/or at too high a heat.
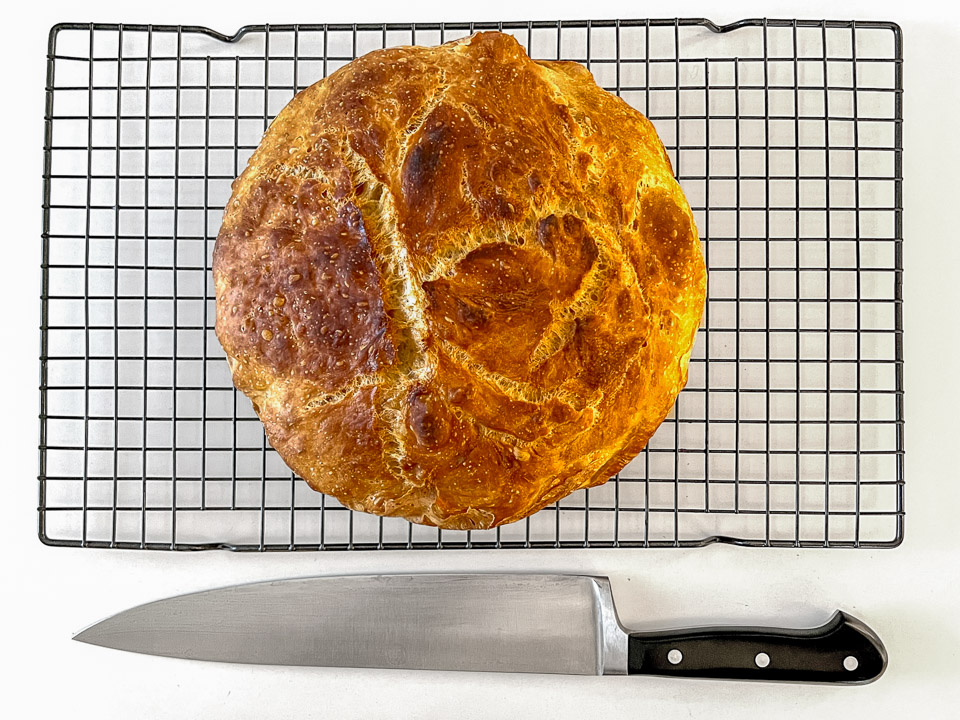
- The bread is heavenly on the day it is baked, but it’s difficult to make a clean cuts. Usually, after the bread is thoroughly cool (2 hours or so), I put it into a gallon size ziplock bag and store it in the refrigerator for a couple of days. I then slice it with a 12″ chef’s knife (which works better than a serrated bread knife IMHO) and return the cut loaf into the plastic bag and store it in the refrigerator.
- If the loaf is particularly large, I cut it in half and store it in two bags. It keeps for at least week.
- Toast slices until the crust is crispy again. (~5 or 6 min. on High.) Toasting is essential to getting the best flavor and texture, but watch out that you don’t injure your gums or the roof of your mouth.
Method:
Cut piece of aluminum foil that is somewhat larger than your bowl. Set aside.
Heat the water in the microwave to approximately 100 degrees F. (38 deg. C). Set aside.
Pour (or sift) the flour into a bowl. Sprinkle yeast and salt evenly over the flour and mix well with a with a wood spoon. Then add the warm water and mix well with a wood spoon until it is one uniform mass. Then use a spatula to scrape the sides of the bowl clean. i.e. into the dough. Do not over-work the dough.
Cover the bowl with aluminum foil and set aside someplace where it’s room temperature (60-80 degrees F, which is 16-27 degrees C). Place on a wood cutting board, but not directly on a stone or quartz counter, or it won’t rise as much as it could.
Allow to rise for 18 hours, at room temperature.
Remove the foil and set aside. Using your flat spatula and working in a circle, scrape the dough along the sides of the bowl, pulling the dough strands from the edge of the bowl over the dough. Turn the bowl as you work your way 360 degrees around the bowl. Then cover it with the foil again and set aside for 2-2.5 hours.
Place your oven rack to the center position and place your Dutch Oven and cover in the oven, next to one another. When the 2-hour timer sounds, turn on your oven to 500 degrees F (260 deg. C). Once the oven indicates that temperature has been reached, set a timer for 20 minutes and let the Dutch Oven heat up further.
Remove the Dutch Oven from the oven. BE EXTREMELY CAREFUL.
If you didn’t make a form with the parchment paper: Carefully pour the dough on the center of the parchment, using your spatula to help disengage the dough from the bowl. Try not to deflate the dough or work it as you help it out of the bowl. Be gentle and don’t worry if it isn’t a perfect circle (it won’t be). Resist any desire to push the dough around to make it perfectly round.
Quickly pick up the parchment paper by the four corners and place it into the Dutch Oven. Replace the cover and put it back into the oven.
If you did make a parchment paper form: Place the paper form into the Dutch oven and push it down to the bottom with a wooden spoon or silicone spatula. Carefully transfer the dough into the Dutch oven; quickly return it to the oven and replace the hot cover.
Bake for 18 minutes, covered. Then remove the cover and bake for additional 35-45 minutes. Next, turn the oven OFF and let the bread sit in the oven for another 10 minutes. Keep an eye on it to make sure it doesn’t burn.
Place the Dutch Oven on top of your cooktop. Carefully grab the parchment paper at two opposite points and transfer the bread to a cooling rack. If necessary, use stainless steel tongs to remove the bread.
Allow the bread to cool completely. Then place into a one gallon plastic ziplock bag and store in the refrigerator. For best results, don’t cut the bread until the following day; two days later is even better. The crust softens while in the fridge and when it comes time to slice it, it’s easy to do so with a large knife. It works better than a bread knife.
Larger Loaf Recipe
Makes one larger loaf
Ingredients:
620 grams All Purpose flour (4 cups)
Heaping teaspoon of Instant yeast
2 rounded teaspoons salt
600 ml warm water (~100 deg. F) (~38 C)
Method:
Follow the instructions for the Original loaf, above.